Table of Contents
You may want to move to a new WooCommerce site and want to import orders from your old one. Adding each order details individually can be tedious. So there comes the need for Order Import Export for WooCommerce plugin. This plugin lets you import all your orders and related data to WooCommerce and any other eCommerce platform.
The plugin has the following features that can assist you in importing orders to your store:
- Quick import of orders using a CSV file
- Import orders from different locations – from your local computer, from FTP, or from a URL
- Bulk update product data
- Import coupons
We believe you have a CSV file with all your orders exported. That being said, let’s dive in.
Step 1: Plugin Installation
Open your WordPress dashboard.
Go to Plugins > Add New.
Search for Order Import Export plugin in the WordPress plugin directory.
Install and Activate the plugin.
Step 2: Select Post Type
Open your WordPress dashboard, and navigate to WebToffee Import/Export pro > Import.
From the dropdown menu, select Order as post type to import.

Step 3: Select an import method
Let’s see each option in detail.
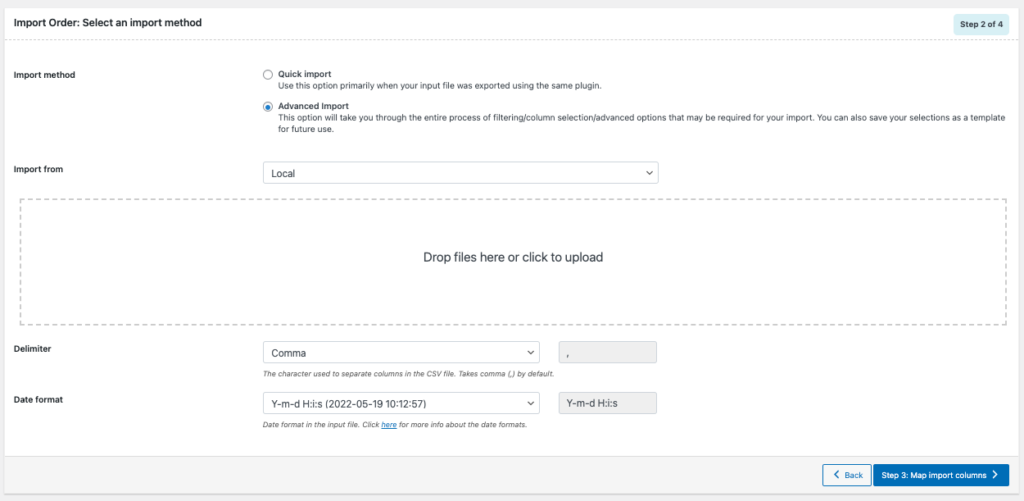
Select how you want to import the orders – Import method
There are 2 options available here.
- Quick Import
This option is preferred when you exported the input file using the same plugin or if you have the CSV file created in the above format.
- Advanced Import
In this option, you will be guided through the entire process of filtering/column selection/advanced options that you may need for your import. You can also save your selections as a template for future use.
Select the location of the CSV file – Import from
You can set the file path from where you want to import.

The plugin offers multiple options you can import files from:
- Local: Files saved on your computer
- URL: Add an external URL to the file to be imported
- FTP: Add an FTP profile to import files using FTP
- Already existing file: Choose this option, if you want to import files from previous uploads.
Note: For importing a file from FTP, you need to have the FTP location configured in the plugin. Also, you can only use an existing file for importing if you have an import history in the plugin.

Set the CSV Delimiter
You can set the character for separating columns in the CSV file.
Can use any character from the dropdown list. There’s also an option to add custom characters.
Proceed to the next step.
Step 4: Map Import Columns
Here you can map column name and column ID. Mapping is done to mention the column name is specific to the column name in the import file.
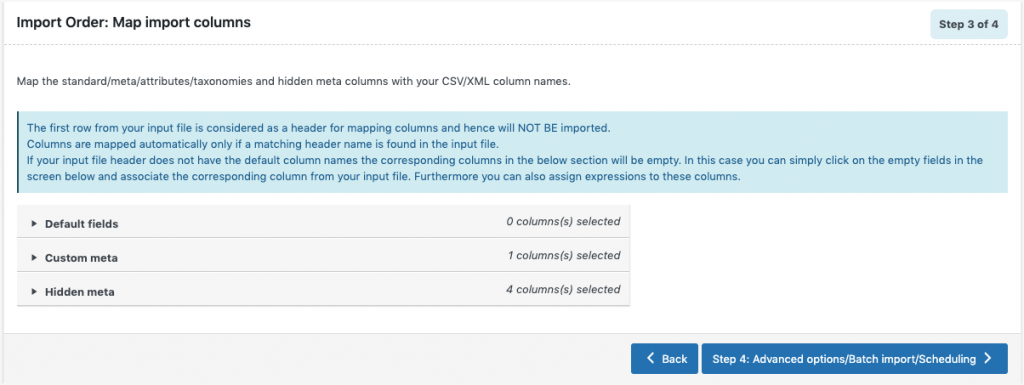
Default fields: The mapped column names appearing in this section can be edited if required. On choosing a pre-saved template, you can view the preferred names and choices that were last saved.
Set values for columns
You can update the values in the input file by clicking on the pen icon near the column name.
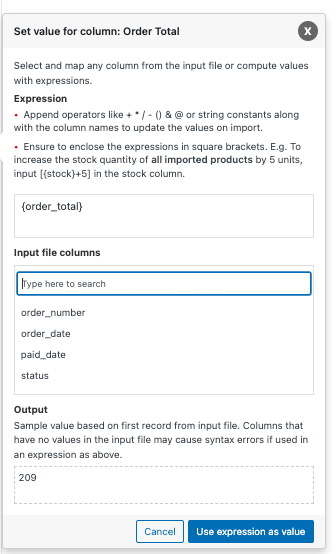
Expression
Here, you can edit/modify values in the input file by using operators like + * / – () & @ or string constants along with the column names.
Input file columns
You can add values from multiple columns by selecting the column names here.
Output
The Output field displays the sample value based on the first record from the input file. Columns that have no values in the input file may cause syntax errors.
To make it clear here is an example:
Let’s say you want to increase the Total Tax by 5.
Enter [{tax_total} +5] in the Expression column for Total Tax.
![Increasing total tax by 5 using [{tax_total} +5] expression](https://www.wpfloor.com/wp-content/uploads/2022/06/Setting-Values-of-Columns.png)
There you can see 5 will be added in the Output section.
Step 5: Advanced options/Batch import/Scheduling
The advanced options on this page let you update existing orders, schedule an import, or opt for batch imports. Additionally, you can save a template file for future use.
Let’s see the options in detail.
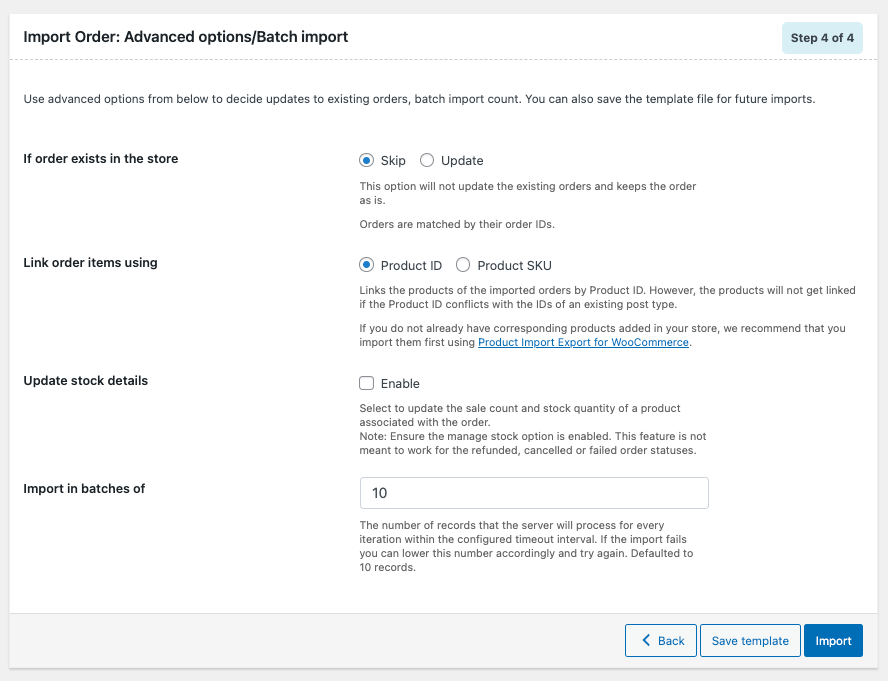
If order exists in the store
Select the action for which you want to be done, if the order exists in the store. You can either select ‘Skip’ or ‘Update’.
Link order items using
Select how you want to link order items. Using Product ID or Product SKU.
Update stock details
Enable this option to update the sale count and stock quantity of a product associated with the order.
Import in batches of: Enter the number of records that you want the server to process for every iteration within the configured timeout interval. If the import fails due to timeout you can lower this number accordingly and try again.
Save the template file for the future (if needed).
Step 6: Import/Schedule
You can either import the orders directly into your store or schedule the import.
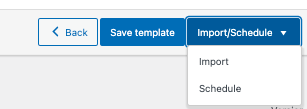
To schedule the import: (Only for premium)
Click on the Schedule option and the cron schedule window will appear as shown below:
The plugin supports two different schedule types:
WordPress Cron: The WordPress Cron schedules the import at a specific time depending on the site visitors.
Server Cron: By selecting Server Cron, a specific URL will be generated and you have to add that URL to your system to trigger the import each time.
You can also configure the time and interval at which the import is to be scheduled.
To directly import:
Click on the Import option.
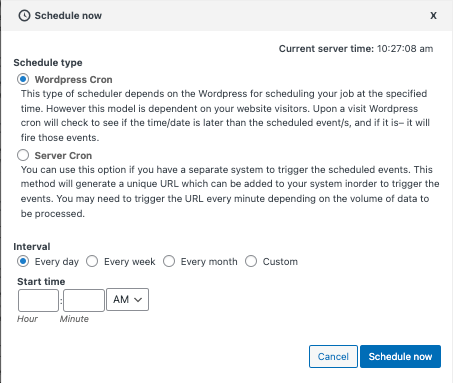
Once the import is completed, a pop-up will be displayed showing import status which contains the number of successful imports and failed imports (if any).
How to import WooCommerce subscription orders using a CSV file?
To import subscription orders using a CSV file you need to purchase the premium version of the plugin. After purchasing the premium version, follow these steps. The steps will be similar to the order import mentioned in this article but with some minor changes, which we will discuss.
Step 1: Select the post type
Select Subscriptions as the post type.

Step 2: Select import method
- You can choose the import method here. If you want to go through advanced filtering and column selection processes, choose Advanced import or else choose Quick import.
- Select the file path in the Import from option.
- Set the Delimiter and Date format.
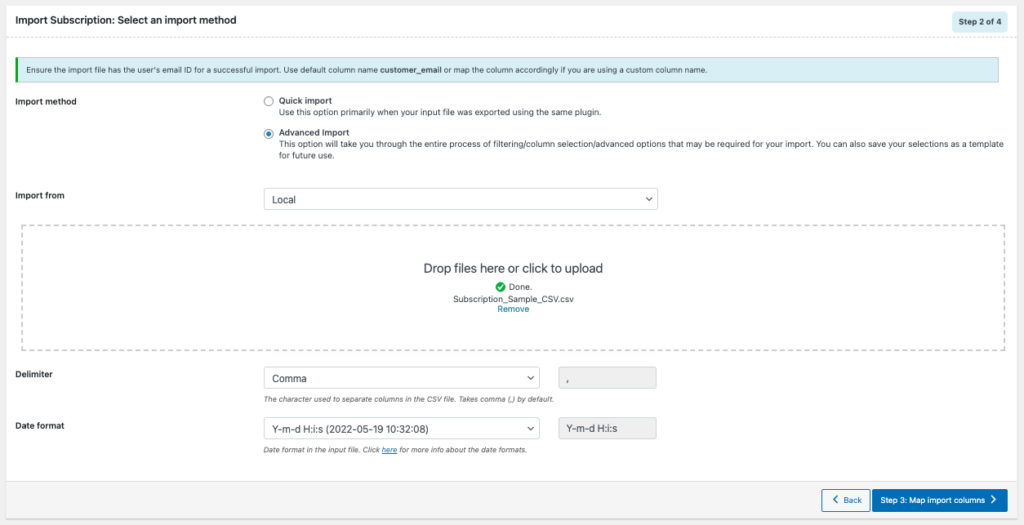
Proceed to the next step.
Step 3: Map import columns
- Map the standard/meta/attributes/taxonomies and hidden meta columns with your CSV/XML column names.
- You can update the value in each column by clicking on the pen icon. (As discussed earlier in the article)
Step 4: Advanced options/Batch import/Scheduling
Here are the various options in Advanced Options:

Update Only
On selecting “Yes”, the store is updated with the data from the input file only for matching/existing records from the file. On selecting “No”, the entire data from the input file is processed for an update or insert as the case may be.
If the subscription exists in the store
One can either Skip or Update the entry.
If conflict with an existing post ID
Select the action to be taken when there is a conflict with an existing post ID; either skip or import as a new item.
Link orders using _wt_import_key
Select Yes if you want to link underlying orders related to the imported subscriptions.
Link products using SKU instead of Product ID
Select ‘Yes’ to link the products associated with the imported subscriptions by their Product ID.
Delete non-matching subscriptions from store
Select yes to remove subscriptions from your store that are not present in the input file.
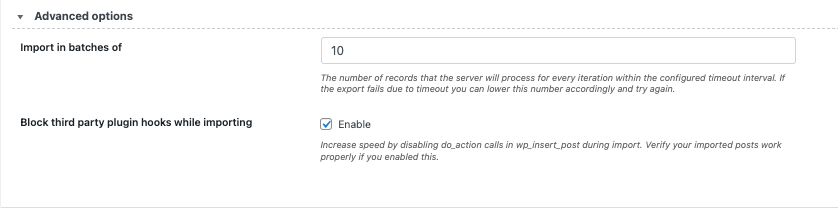
Advanced Options:
Here you can set the batch import and the option to block third-party plugin hooks while importing.
Save the template for future use. (if needed)
Then proceed to Import/Schedule.
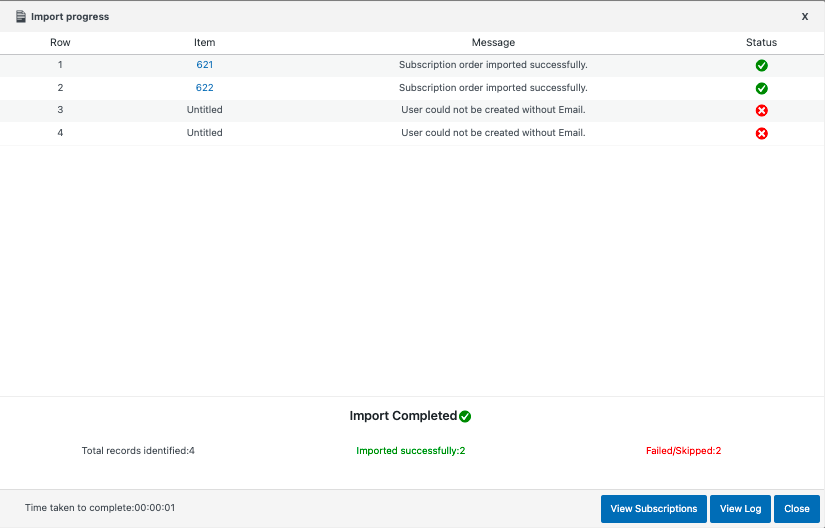
The Import status pop-up will appear once the import has been completed. It will contain the number of successful imports and failures (if any).
To conclude:
As we said at the beginning of this article, importing order details one by one can be pretty hectic. The plugin we discussed in this article is an allrounder plugin that lets you import/export Orders, Coupons, and Subscriptions with a few clicks. There is also an import export suite for all the import/export functionalities you need in your WooCommerce store.
We would love to hear your support and feedback. Drop us some love in the comments below if this article helped you.
