Table of Contents
WooCommerce is a great WordPress plugin to create online stores effortlessly. That’s why most small online store owners are using the plugin to create their eCommerce sites. But there is a problem with that, most of the startup sites have the same design.
So, as a store owner, you may want to make your site different than the sites of your competitors by customizing the default single product pages. But the question is how to customize the WooCommerce Product Pages?
There are two recommended ways to customize WooCommerce Product Pages We can either make basic changes using additional CSS or create customized product page templates from scratch.
2 Ways to Customize WooCommerce Product Page
The default product page of WooCommerce is used by most of the new players in the eCommerce industry. Because most of them are beginners and don’t know how to customize WooCommerce product pages.
It’s okay If you also don’t know that. If you are a developer or have some basic knowledge, you can easily make some basic changes using additional CSS. However, you can also use a plugin like the ProductX Gutenberg WooCommerce blocks in case you don’t want to write codes.
Let’s walk through both of the ways and you can follow the way that suits you the best.
Customize WooCommerce Product Page Using Additional CSS
According to the blog post published on the official site of WooCommerce, we can customize the product pages by using the pro extension called product addons or using additional CSS.
So, in this blog post, I would like the list down the additional CSS which are commended on the official site of WooCommerce, and how we can use them on our site. However, WordPress also has some customization options that you can explore by using the theme customizer.
Here’s how you can add CSS to your WooCommerce site.
- Go to the front end of your site while logged in.
- Click on Customize.
- Go to the Additional CSS option.

Here you can add the CSS to make necessary changes to single product pages. Check out the list of most used CSS for WooCommerce.
1. Change the font size of Product Titles
You can use the below code to change the size of the product titles. For example, change 36px to 50px or whatever you want. Then add the code to the additional CSS box and click on the publish button.
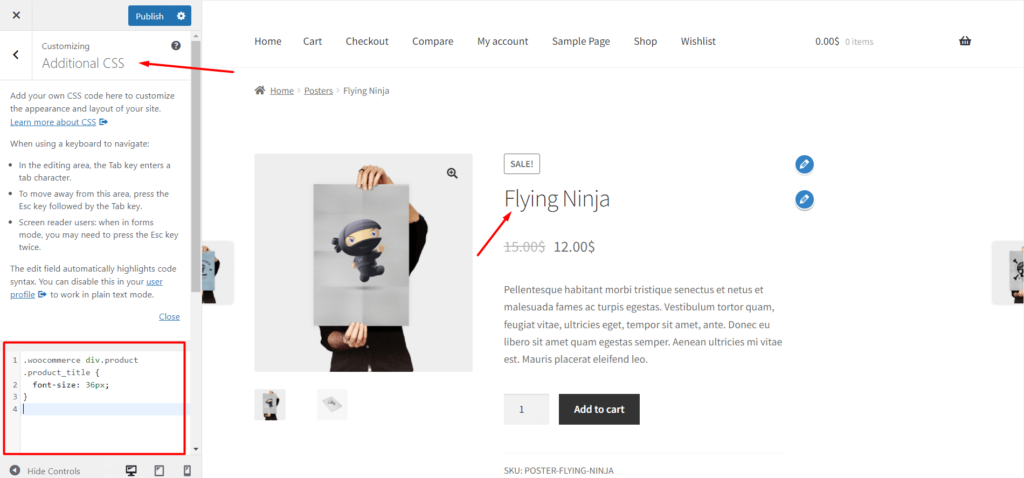
| .woocommerce div.product .product_title { font-size: 36px;} |
2. Change the color of Product Titles
For changing the color of the product titles you can use the below code with your desired color code. So that, the color of the product titles will be replaced with the color you want.
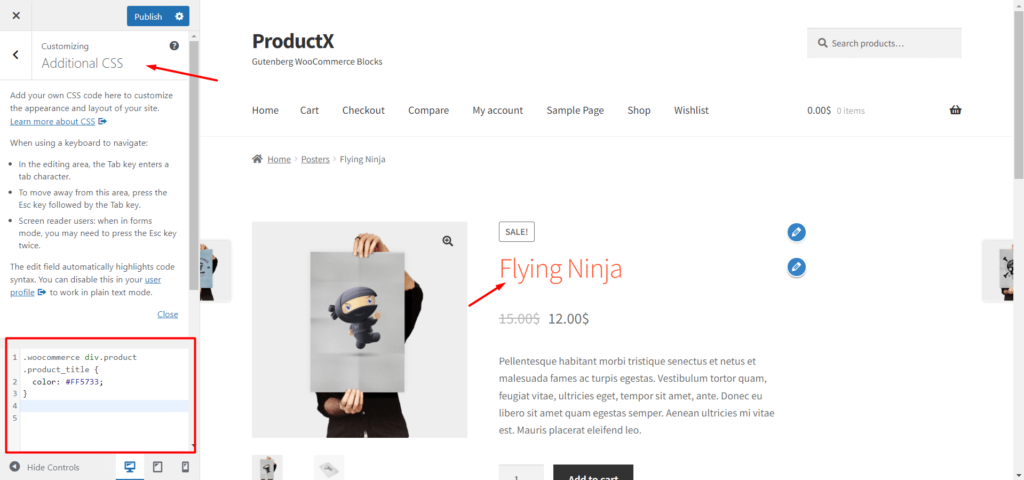
| .woocommerce div.product .product_title { color: #FF5733;} |
3. Make variation labels bold
If you have variable products on your WooCommerce store you can make the variations label text bold by using the below code.
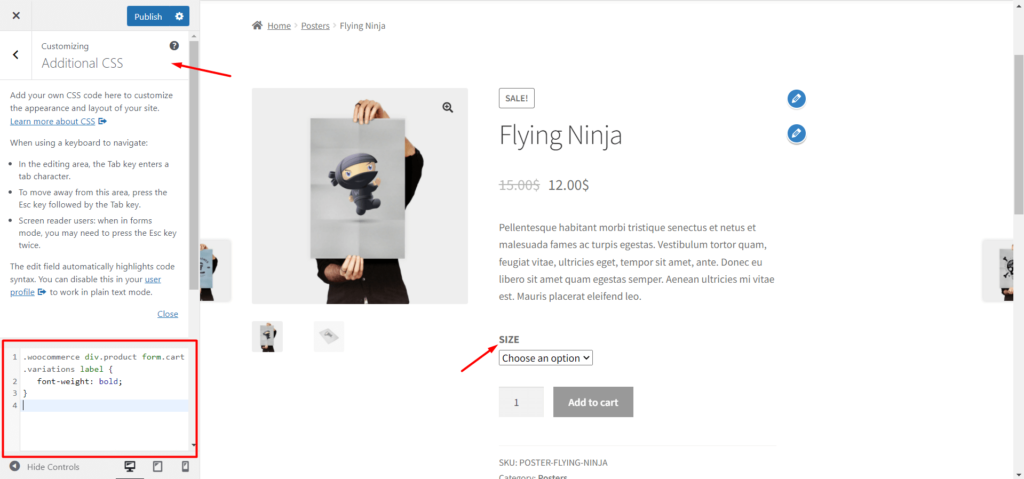
| .woocommerce div.product form.cart .variations label { font-weight: bold;} |
4. Italicize variation labels
For styling, use the below code to add the italic style to the variation label text.
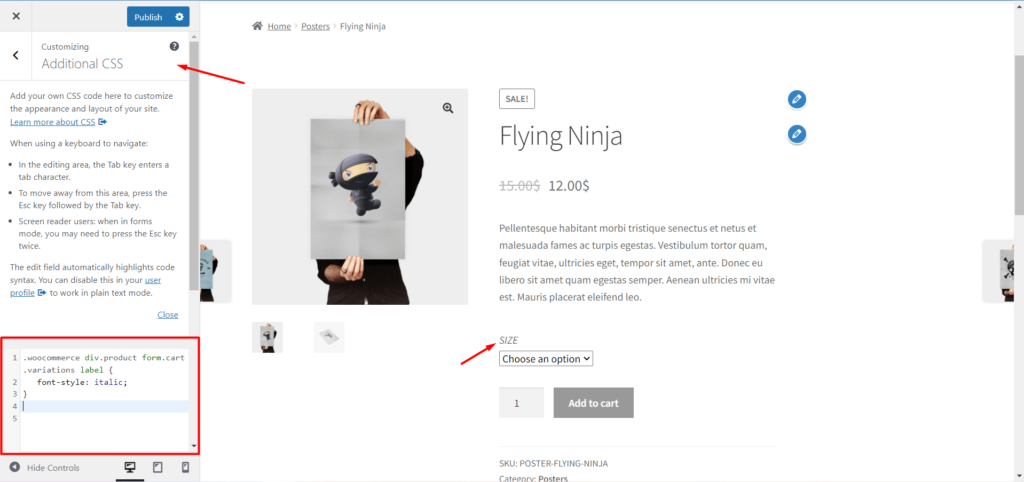
| .woocommerce div.product form.cart .variations label { font-style: italic;} |
5. Change the Buy Now button background color:
You can also make changes to the “Add to Cart” button. Use the below code to change the background color of the button.
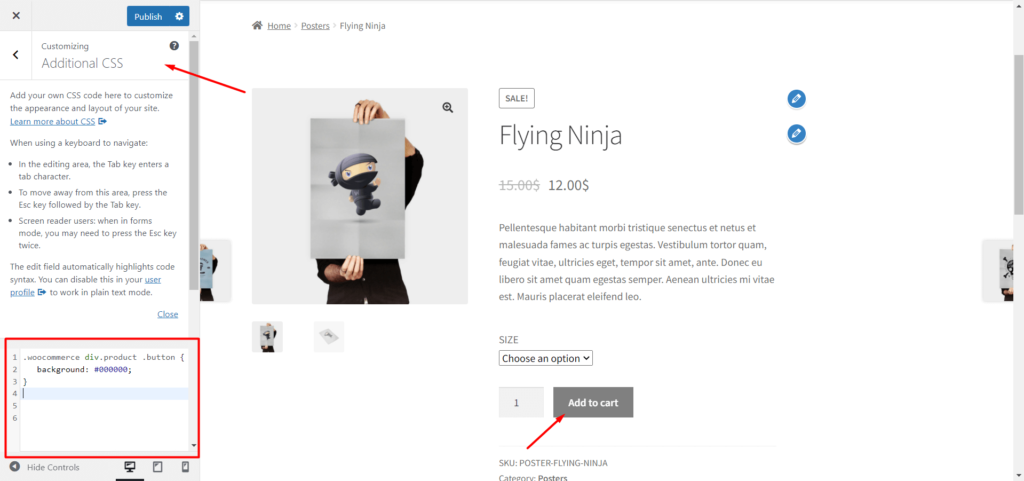
| .woocommerce div.product .button { background: #000000;} |
Customize WooCommerce Product Page Using ProductX
If you don’t want to write code to customize WooCommerce product pages then ProductX is the perfect solution for you. It offers an exclusive WooCommerce Builder Addon to create custom templates for Shop, Archive, and Single Product Pages.
You can create templates for specific or all single product pages. So that, the custom template will be replaced with the default WooCommerce templates. For creating a custom template you can follow the below steps.
Step 1: Install ProductX Plugin
First of all you need to install both the free and pro version of the ProductX plugin. Because the WooCommerce Builder addon is a pro feature and for using the pro version the free version also needs to be installed.
Install the Free Version: The free version of ProductX is available in the WordPress directory. To install this plugin:-
- Click on the “Add New” button from the Plugin section.
- Search for ProductX.
- Click on the “Install” button.
- After Installation click on the “Activate” button.

After successfully activating, it is ready to use. With the free version, you can create a custom home page using the Starter packs, Product filter, Pagination, and many more features.
Install the Pro Version: If you want to take full advantage of the ProductX plugin then it is recommended to install the Pro version along with the free version.
The Pro version offers multiple Premade starter packs, WooCommerce Wishlist, Product Comparison, WooCommerce Builder, etc.
At first, you need to purchase the plugin and download the plugin file. To install it follow the below steps:-
- Click on the “Add New” button from the plugin section.
- Click on Upload Plugin.
- Upload the downloaded plugin file.
- Install and activate the plugin.
Step 2: Turn on WooCommerce Builder
For creating a customized WooCommerce Product Page, you can use the WooCommerce builder addon of ProductX. So, you need to turn on the addon to start using it.
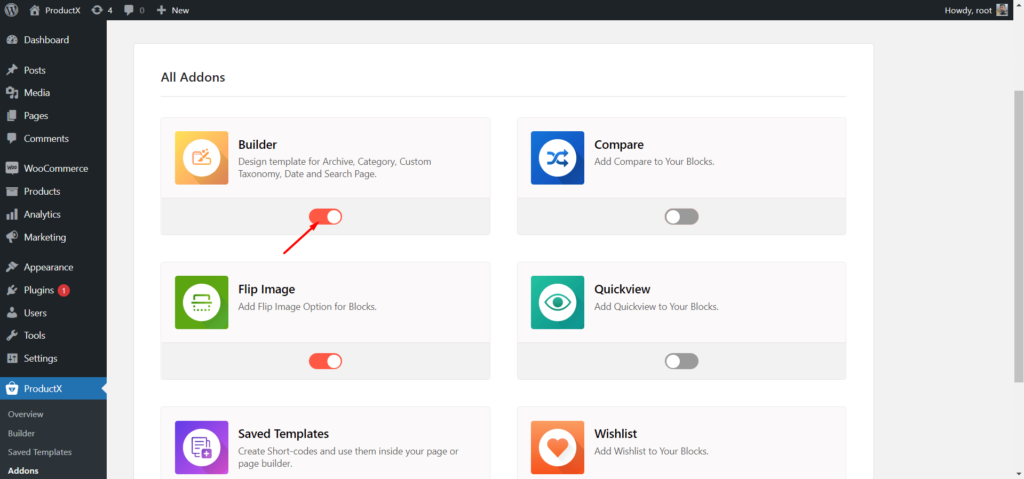
- Go to the All Addons Section.
- Click on the Builder Addon.
After turning on the Addon, there will be a Builder section along with other options of ProductX.
Step 3: Create New Template
Now, we have to create and customize WooCommerce Product Page template from scratch. For that:
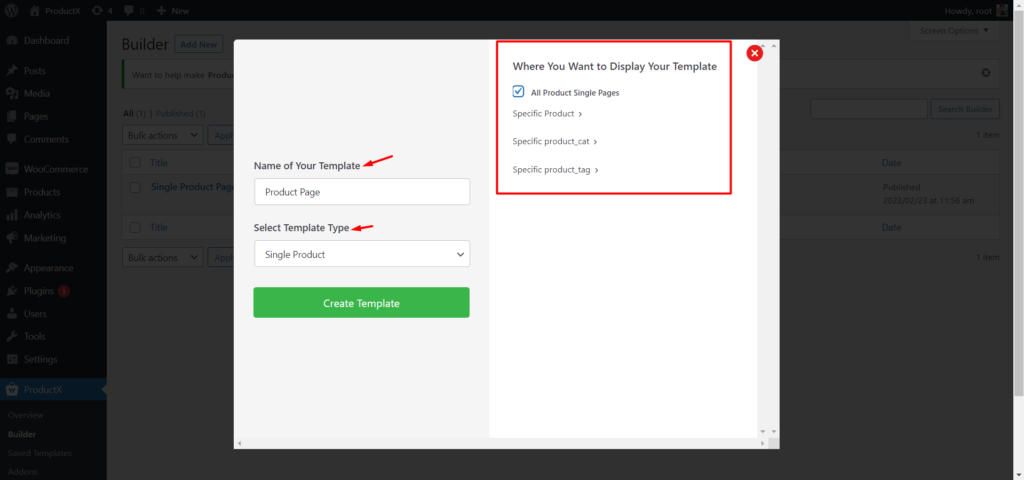
- Go to Builder Section.
- Click on the “Add New” Button.
- Give a Name to the Template.
- Choose Template Condition (Specific or all Product Pages).
- Click on Save and start customizing the Template.
Now customize the WooCommerce product page template by using the 13 new Product blocks finely crafted for single product pages.
Step 4: Add and customize Breadcrumb Block
At first, we can add the Breadcrumb block which indicates the current page location to the visitors. To add this block you have to click on the plus icon and then select the Product Breadcrumb block.
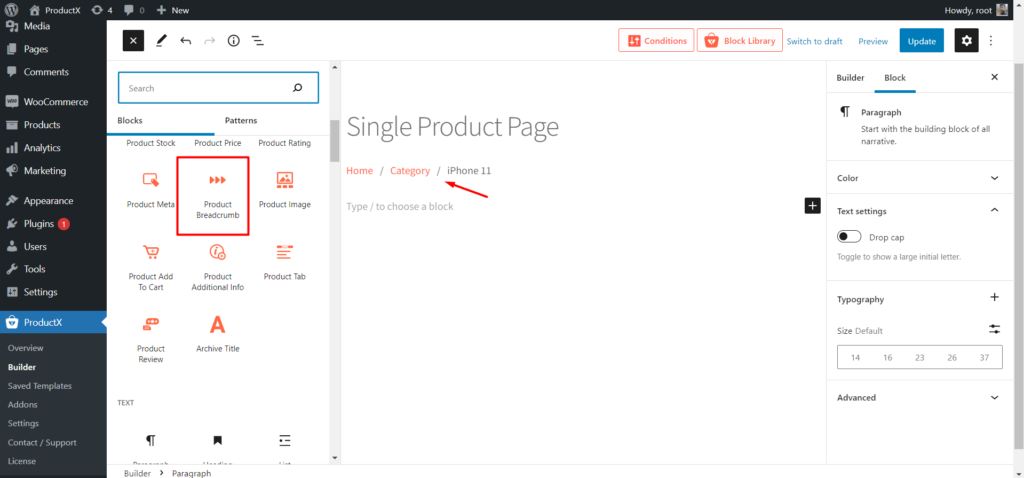
After adding a block, we can also make some changes using the available options:
- Choose desired colors for Text, Link, and Link Hover.
- Choose custom fonts from the Typography Control.
- Adjust the size and choose the color of the Separator.
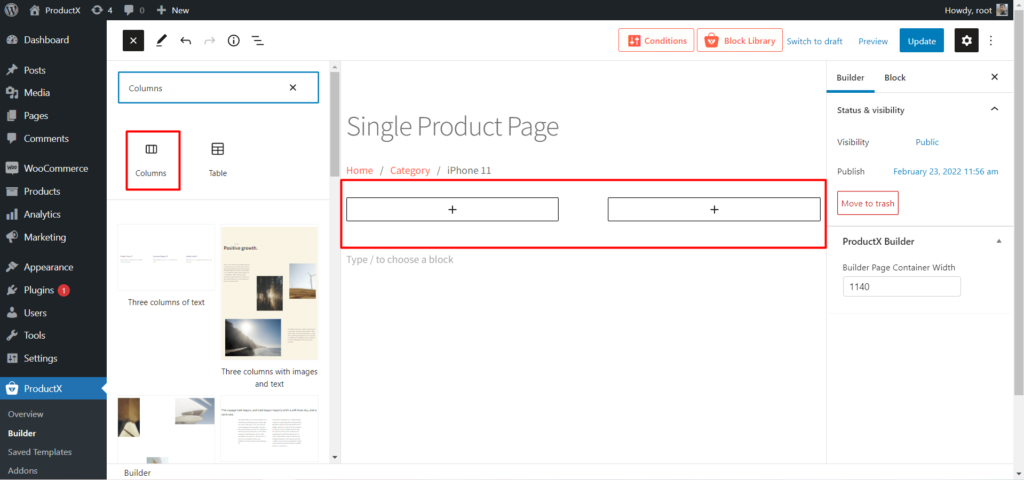
Step 5: Add and customize Gutenberg Column block
If you want to showcase product images and details side by side, you need to use a column block. As I want that, I will click on the plus icon and add a 50/50 ration column block.
Step 6: Add and customize the Image block
Now, you can add the Image block on the left side of the column. So that, the featured and gallery images will be displayed dynamically.

After adding an Image block you can play with the below options:
- Show or hide images of the gallery.
- Show or hide the arrow.
- Customize the Icon.
- Customize Gallery position.
Step 7: Add and customize the Product Rating block
If you want to let the visitors see and provide ratings for the products you can use the Product Rating Block. For adding this block decide the position and click on the plus icon where you want to add the block.
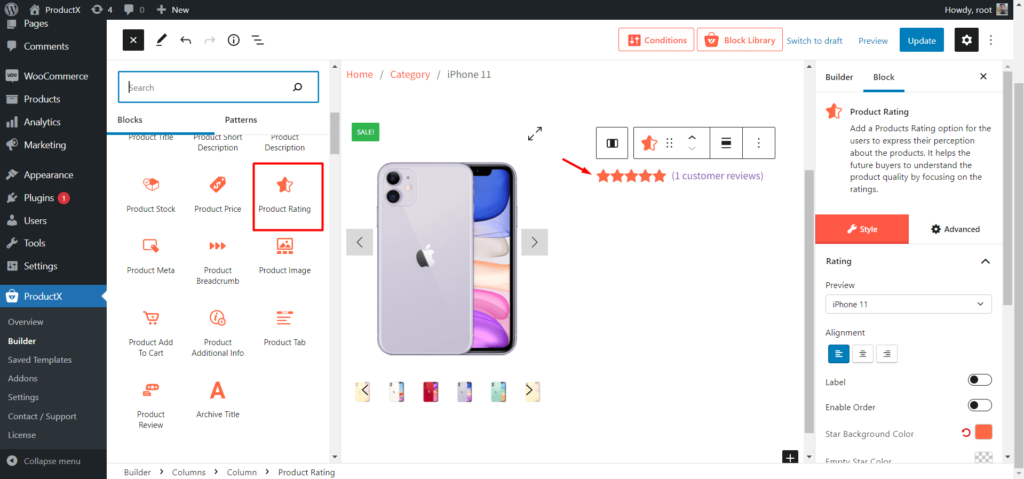
Product Rating Block comes with the below options:
- Select desired size.
- Choose the desired alignment.
- Choose Star color.
- Choose Star Background color.
Step 8: Add and customize the Product Titles block
After product rating, you should add the Product Titles block. Decide the position and click on the plus icon to add the Product title block. So, the product titles will be dynamically displayed on the title block.
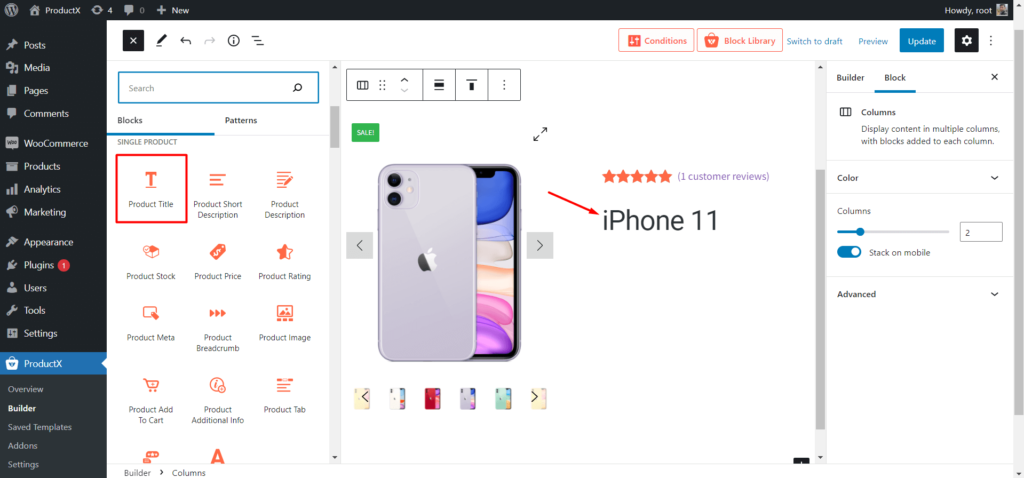
Below are the Customization options:
- Choose the desired size.
- Select desired alignment.
- Choose a specific color.
- Change font style using typography.
Step 9: Add and customize the Short Description block
If you had written shot descriptions for product pages then you should add this block to the Product page template. So that, all product pages will represent custom short descriptions.
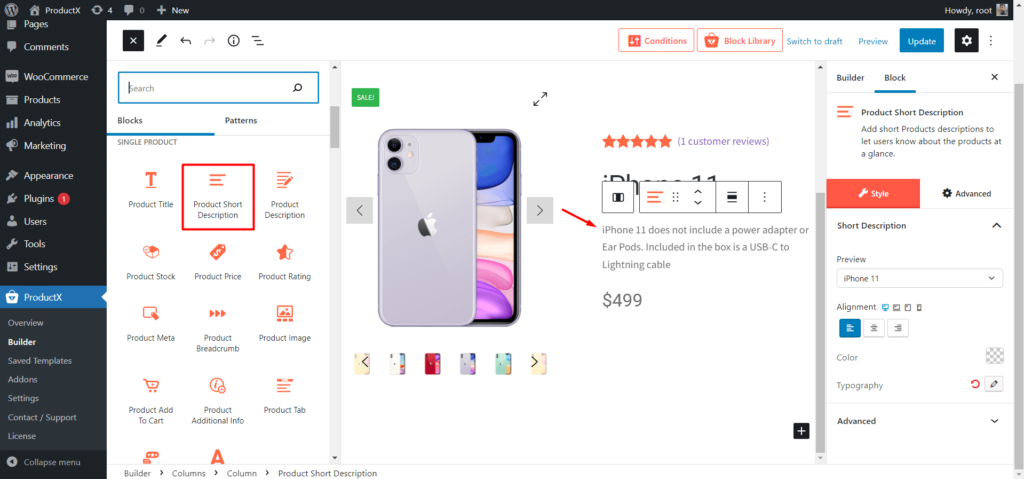
Use the below options to customize the block:
- Select alignment.
- Choose the desired color.
- Customize typography.
Step 10: Add and customize the Product Price block
It is one of the most important blocks. You can add this block to a single product page template to show product prices for potential buyers. So, decide the position and click on the plus icon where you want to add the block.
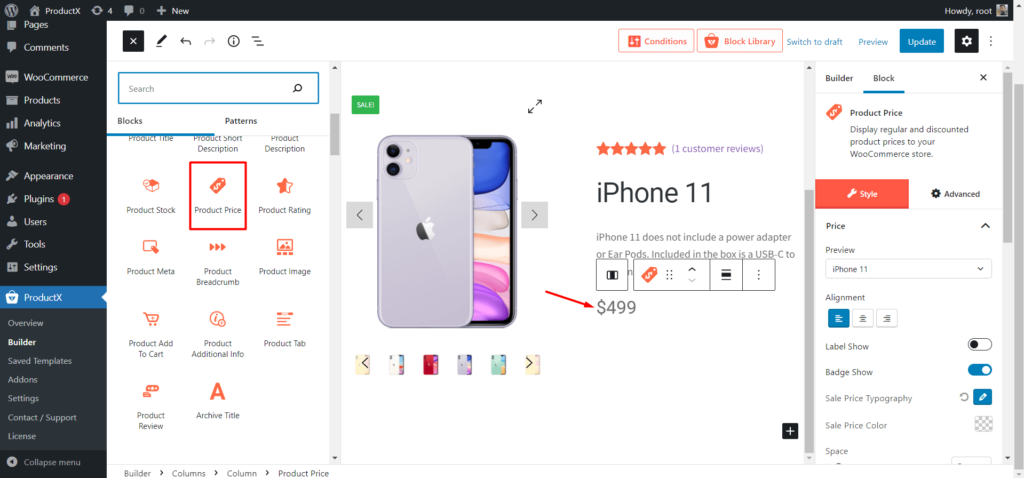
Product Price Block has below customization options:
- Select desired alignment for the block.
- Show or hide the discount badge.
- Customize the sale price typography.
- Choose your desired size.
- Choose your desired color.
Step 11: Add and customize the Product Stock block
Add this block to showcase the quantity number of products available for purchase. You can add this block anywhere but the standard practice is to add it before the add to cart button.
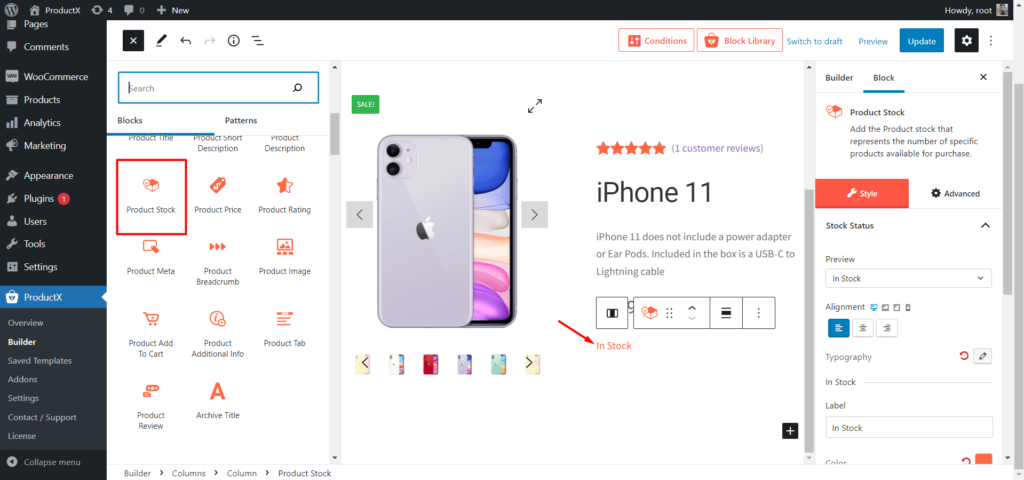
Below are the customization options for the Product stock block
- Alignment selection.
- Color selection.
- Typography control.
Step 12: Add and customize Product Add to Cart Block
Product Add to Cart helps the visitors to add their desired products to the cart in order to buy them. You can add this to your desired position like any other block and customize it.
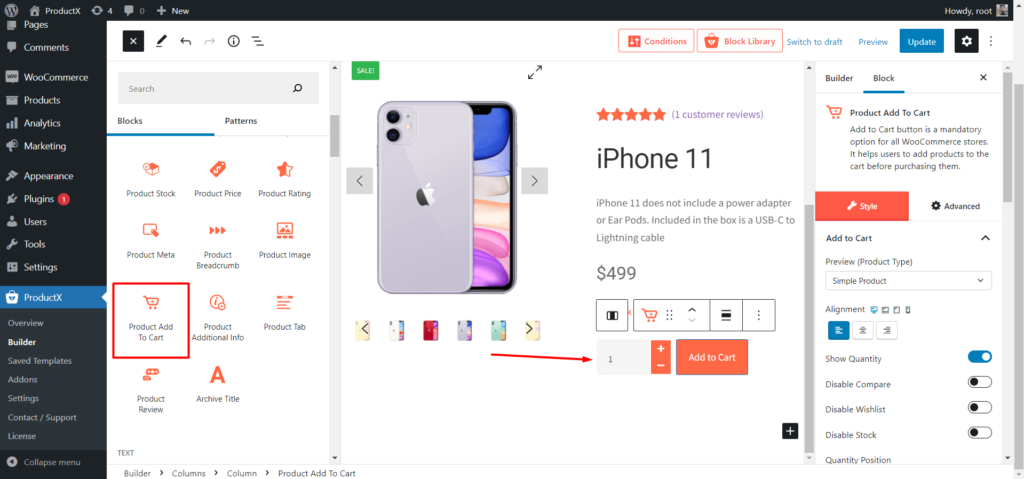
Here are the customization options:
- Show or hide product quantity.
- Show or hide Product Comparison and Wishlist.
- Choose to Add to Cart color.
- Choose Quantity color.
Step 13: Add and customize the Product Meta block
Product SKU, category, and tags will be automatically added to the product pages after adding this block to a single product template.
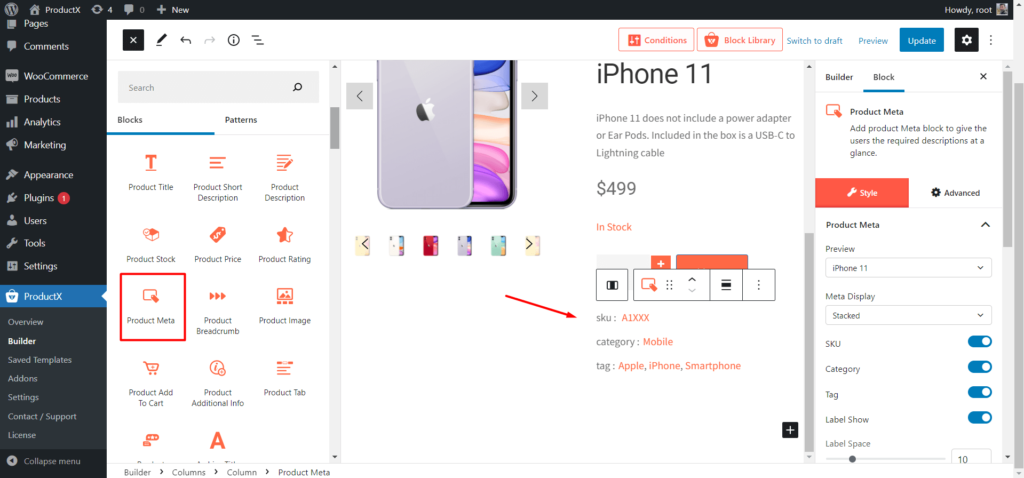
Here are the customization options of this block:
- Show or hide SKU, category, and tag.
- Choose meta headings color.
- Typography control.
Step 14: Add and customize Product Tab Block
The Product Tab is a combination of three blocks (Product Description, Additional Info, and Reviews) that contain different pieces of information about WooCommerce Products.
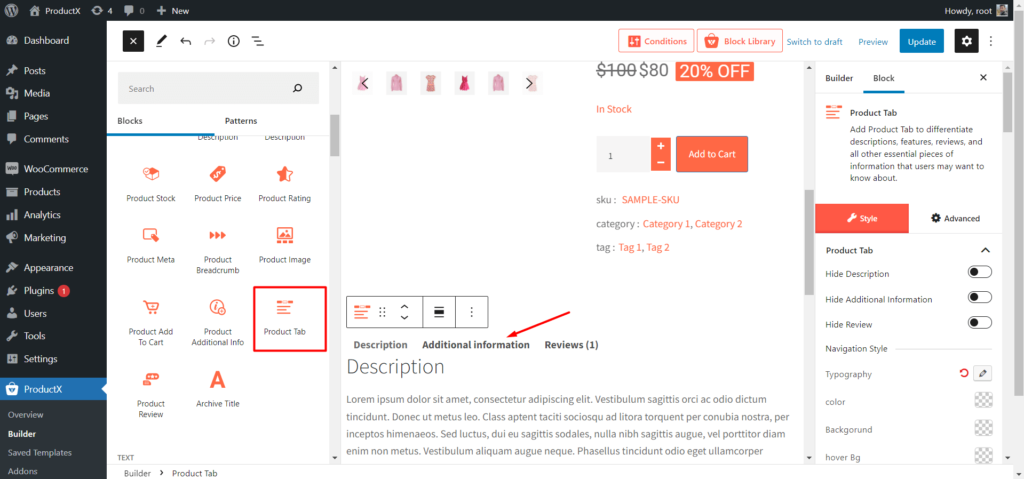
Below are the customization options:
- Show or hide any of the tabs.
- Typography control.
- Choose colors for text, background, and hover background.
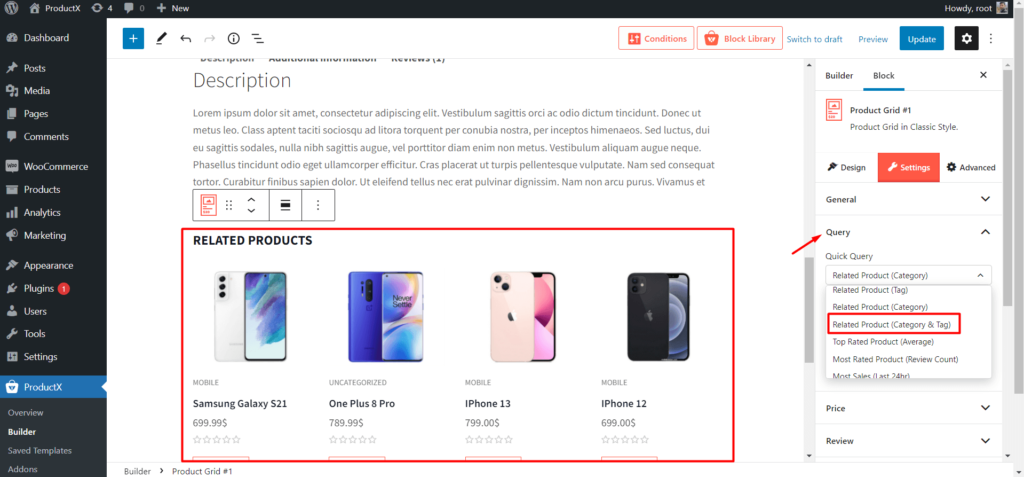
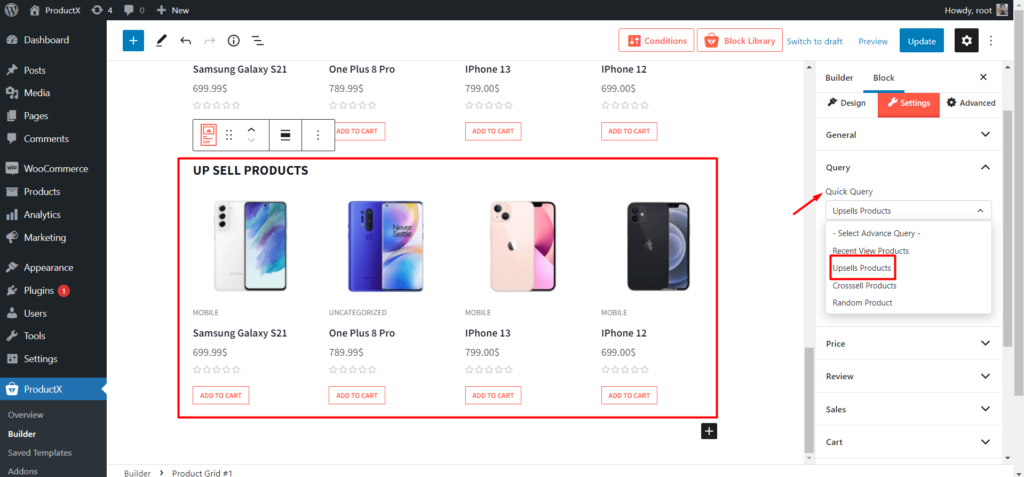
Step 15: Add and customize Related and Up-Sell Products
As we are creating a template for single product pages we can also add related and upsell products. So that the potential buyers will get more options to explore and as a store owner you can increase the average order value.
For adding related products:
- Add a product grid block.
- Change block title to Related Products.
- Sort the products as related using the Quick Query Feature.
For adding Up-Sell Products:
- Add a product grid block.
- Change block title to Up-Sell Products.
- Sort the products as Up-Sell Products using the Quick Query Feature.
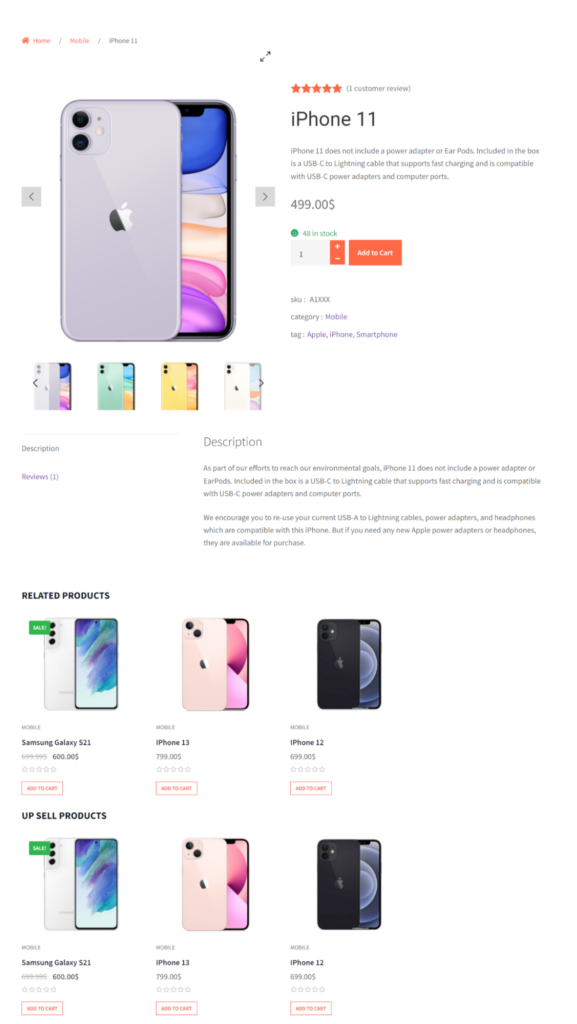
After customizing the template we have to save/update it and check how it looks at the front end.
On-Page Optimization While Customizing Single Product Pages
As we want to customize WooCommerce product pages, we also should focus on-page SEO optimizations as well. After all, all online store owners want to increase sales of the products. That is why we have to customize WooCommerce product pages. But we also have to increase the organic traffic of our online stores for the same reason.
Here are some major on-page optimizations tips to increase organic traffic.
Keyword research: Keyword research is the most important thing for any online business. If you can find out low competitive keywords for the product pages then it will be easy for you to increase the organic traffic.
So, do proper keyword research and select the best keywords that can be rankable with the current domain authority of your site.
Optimize product titles and meta descriptions: After selecting the best keywords you have to place them properly on your product titles on meta descriptions. So that the product pages of your stores can rank higher on the SERP.
Also, focus on optimizing the titles and meta descriptions to increase the click rate.
Place product reviews: Letting the users review your products and displaying them on the product page can increase the trust of the new visitors to your store. Remember all visitors to online stores are potential buyers. So, if they can see and add reviews on the product pages it will increase their confidence to make the purchase.
Keep visitors more on your site: We have to keep the visitors on our site as long as possible. So that we can decrease the bounce rate and increase the dwell time. Because These are some of the most important ranking factors.
As we can add related and upsell products while creating custom product pages, it will make the visitors stay longer on our site to explore more products.
Conclusion
That’s all about how to customize WooCommerce Product Page. Start customizing the product pages of your online stores using the ProductX Gutenberg WooCommerce Blocks. Feel free to comment below if you have any other queries about customizing WooCommerce Product Pages.
