Table of Contents
WordPress is a popular choice for many beginners to start their blogs and websites. One of the factors that makes it popular is that WordPress is optimized for search engines. But to generate good traffic and get to significant positions in the search engine rankings, you will have to get your hands dirty and put more effort into your website’s SEO.
If you are new to WordPress there are many ways you can learn about SEO. This article will help you make the process easy by introducing you to some of the major components of it.
What is SEO and Why do you need it?
SEO stands for Search Engine Optimization. In simple terms, it is just some approaches that you take to make your website optimized for the search engines to rank higher in the search results. As your websites rank higher on the search results, the traffic to your website increases many folds.
Since Google is the predominant search engine, we will be talking about mainly Google in this article. Google uses an algorithm to rank a website. There are over 200 factors that affect the ranking of the website, and the more your website scores on the algorithm, the higher it will be ranked.
Search engines are the major sources of traffic to any website. If your website is not optimized for search engines, it will be harder for you to reach your target audience who are looking for content like yours. When users search for something in Google or any other search engine, the results appear on multiple pages. Your goal must be to appear on the first page of the search results and in the ideal case, among the first three results.
Users are always more likely to click on the results that first appear to them. They would not bother much to go further into the search results. Even if your website is below the fold on the first page, you will not be getting as many clicks as that the ones that appear above the fold. So, for a website to get more traffic it has to be higher in the search engine rankings. And the more you can generate traffic to your website, the more you can monetize your website.
So let us begin with the basics of WordPress SEO.
The Visibility of Your Website
When you are building your website, you can hide your website from search engine crawlers. When the website is under development, you would not want your under construction pages to appear in search results.
During the setup stage of WordPress, check the Search Engine Visibility checkbox if you don’t want your website to be visible to the search engines. You can change the visibility of your website anytime from the Settings > Reading page. Scroll down to the end of the page and uncheck the checkbox and save changes so that your website is visible to search engines and can now crawl your website.

SEO friendly URLs
Permalink structure – The desirable permalink structure for good SEO is the one that can convey to the users what the content is about. Use your target keywords in your URL and if possible begin with it. The URL of a post by default is /p=<postid>. But the id of a post does not help convey the users the content of the website. The desirable URL would be /post-name or /category/post-name.
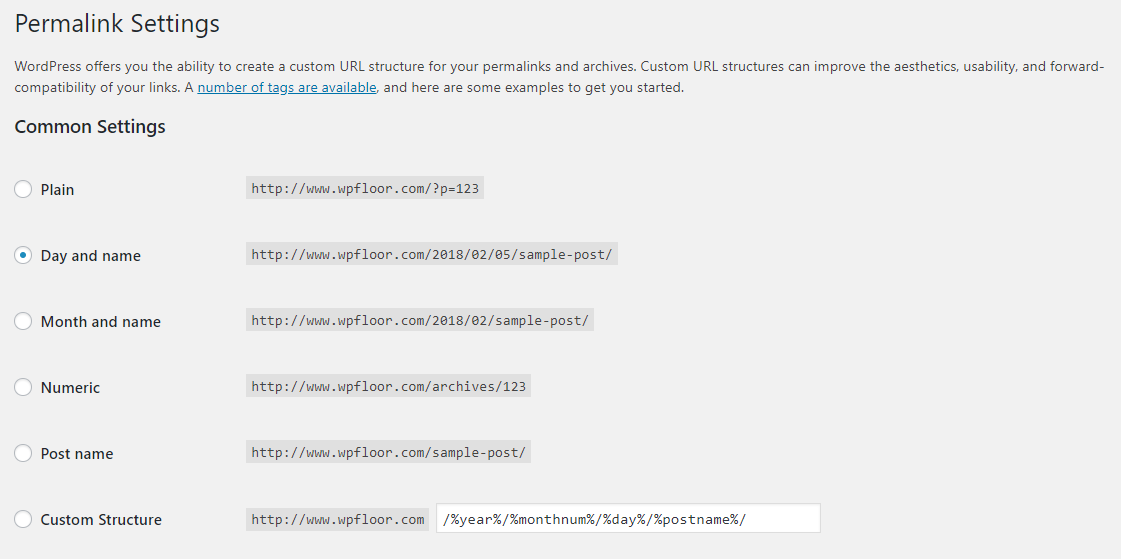
You can change the permalinks of your posts from Settings > Permalinks. To change the permalink to post name, select the radio button for Post name. To change the permalink to /category/post-name. Select the Custom Structure and change the structure to /%ctegory%/%postname/.
Include keywords in the URL – Include the main keywords of the content in the URL, so that the user can understand what the content of the page is. The best case would be to include the keyword at the beginning of the URL.
WWW or Non-WWW Website – For a www and non-www website, there is no advantage for one over the other from an SEO standpoint. The important part is that you select one URL and you stick to it.
Avoid Stop-Words – Avoid using words like the, a, with, is, etc. and make the URLs shorter and cleaner. Stop words are almost completely ignored by search engines. But sometimes changing the URL by removing the stopwords can hurt your SEO. Removing the stop words can sometimes change the meaning of the sentence.
To enable or stop Yoast SEO from removing stop words, Go to Yoast Plugin > Advanced > Permalinks and select from Stop words in slugs. – But do not change it after you have gone live.
Note: If you are using a URL for quite some time and you have good traffic to a website, then do not change the URL. Changing the URL after a long can seriously damage your SEO. You will lose all your social media shares, and users that are using the earlier URL will be greeted a 404 error. If you are changing the URL of the website, you will have to give proper redirections.
Install a WordPress SEO Plugin
There are plugins for everything in WordPress. That’s true for SEO too. There are a lot of plugins for WordPress SEO that can help you easily optimize your website. Yoast SEO plugin is one of the most popular and most downloaded WordPress SEO plugins. It is completely free and gives you many features that you need to make your website SEO-friendly.
The features of the plugin include changing the post’s SEO title and meta description, Google search result snippet preview, focus keyword testing, breadcrumb support, add XML sitemap, add focus keyword, etc. You can also go premium with the plugin if you need advanced SEO.
Add XML Sitemap
An XML sitemap is a file that contains all the URLs of the pages in your website – XML files are important because they make it easier for search engines to find your site’s pages. Google ranks web pages, not just websites. Adding XML files has no downside. And it helps to improve the SEO of the site, by making it easier for the search engines to find the pages of your website.
When using the Yoast SEO plugin, an XML sitemap will already be created for you. You can access your XML sitemap by appending /sitemap_index.xml. Next, you need to add the XML sitemap to Google.
Set Up Your Site With Google Search Console
Google Search Console is a free service. It is also called webmaster tools. it will make sure that Google can access your content. Helps you understand how your website will be seen in the search results. Google Search Console will give you an insight into data like the terms that are used to access your website, compare queries to know if certain queries are making more traffic to your website, backlinks to your website, how often your pages are clicked, etc.
Setting your website up with Google Search Console will help you monitor website traffic, optimize ranking, and monitor and to an extent resolve server errors, site load issues, and security issues.
All this information makes it easier to understand what brings traffic to your website, where the website needs works, and what changes to bring to make the website perform better and make decisions accordingly.
So what you need to do now is to add your website to the Google Search Console. First, you need to have a Google account to use Google Search Console. Click on Add a property. Enter the URL of your website. Then click on continue.

Next, you need to verify that you are the owner of the website. There are two methods for which you can do the verification process. The recommended method and Alternate methods.
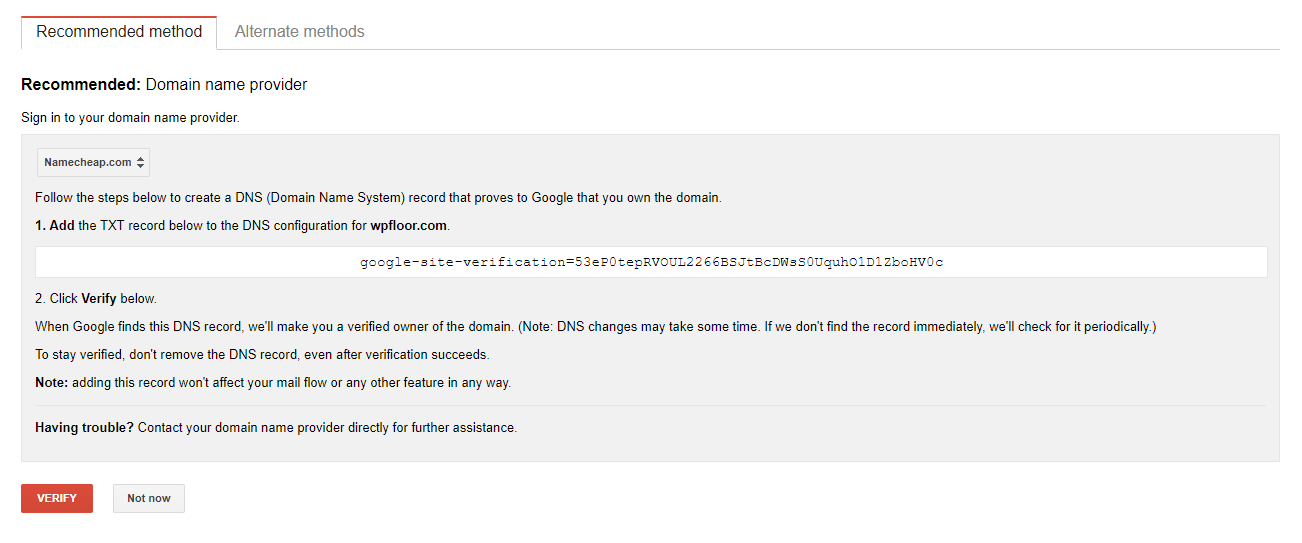
Let’s look at the recommended method. You will need to add TXT record to the DNS configuration of your website.
To add this to your website, go to your admin side of your website. Go to Plugins > Installed plugins. From the Installed plugins page, go to Yoast SEO and click on edit. From the Yoast SEO General settings, go to the WebMaster Tools tabs and enter the string of text generated by Google into the text area labeled Google Search Console.
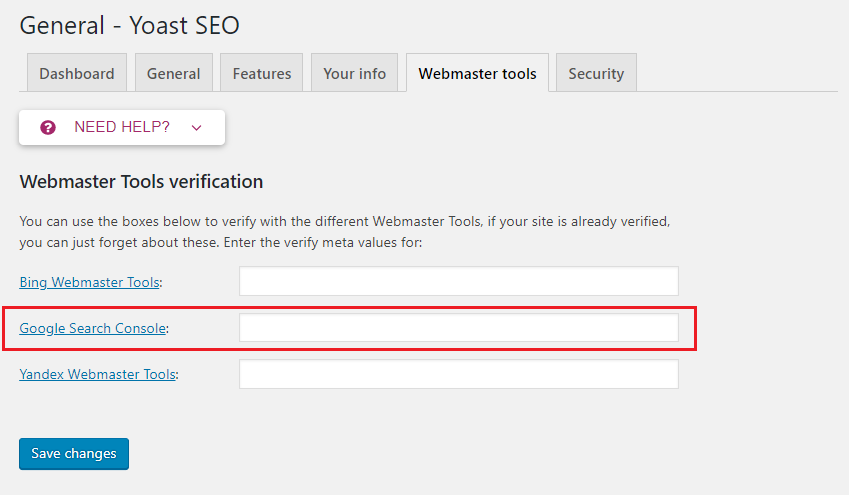
And then Save Changes.
Now switch back to the Google Search Console and click verify. After the verification is successful, you will see a green tick and a success message. This will connect your website to the Google Search Console.
How to Add you Sitemap To Google
After the verification of your website in Google Webmaster Tools has been completed, now it’s time to submit your website’s XML file. To do that click on the Crawl dropdown and click sitemap. Add your main sitemap as sitemap_index.xml followed by your site’s URL. Then go ahead and submit.
After the sitemap has been submitted, Google will show the status as pending. It will take Google some time to start crawling your website. When Google starts crawling your website, you will be shown some stats related to your site and you can start working on improving them.
Optimizing the Content for SEO
Add categories and Tags – Categories and tags are ways to organize and classify the content of your website. Categories and tags make it easier for a user to search for specific content. Categories are like the chapters of a book. They inform you about what the content that belongs to that specific category is about.
Tags indicate the areas and topics that a particular content include. The index of a textbook. You can be sure by looking at them that the content covers all these topics.
Add Internal Links – It is a good practice to link your content to some other relevant content of your website. This can be used to divert the user to the older relevant content of your website. This also increases the user engagement of your website. One way to easily add an internal link is to click on the insert link button, search the title of the post and then choose the right content from the list.
Next, add an SEO title, a meta description, and a focus keyword. Scroll down to the bottom section of the editor to the Yoast Plugin. Here, you can add post title, post description, and focus keyword.
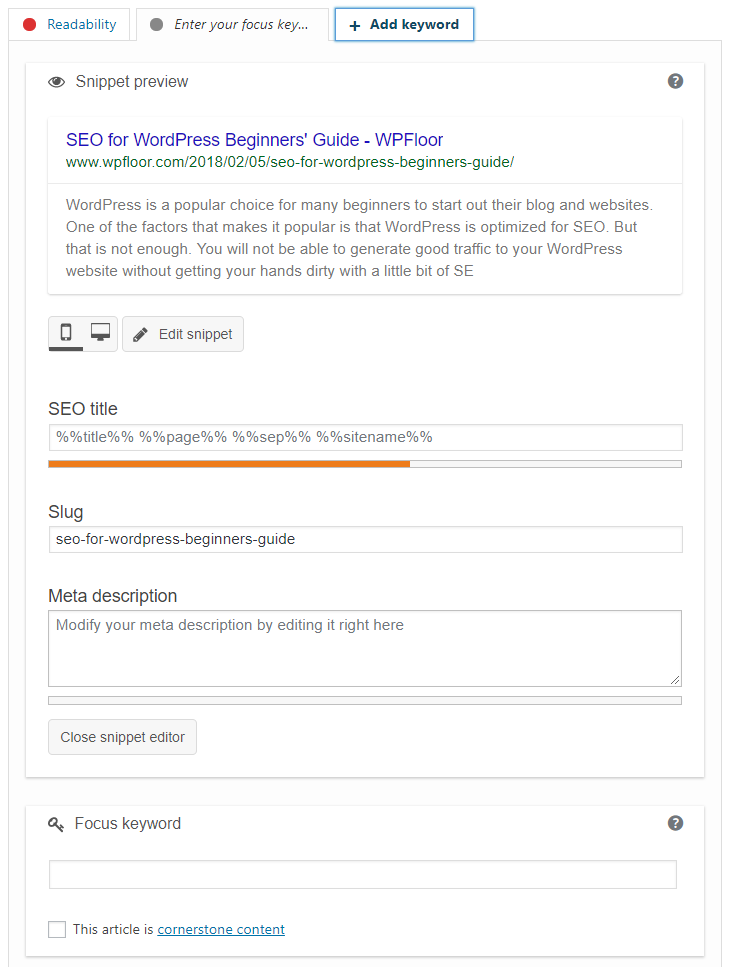
The title – very important in the search engine ranking. optimize with the right keywords that make the users click. Keep the keywords in the beginning and the title should contain the focus keyword. The title should be catchy that makes the user compelled to click. This will result in a higher ranking of the websites.
Meta description – This is a small paragraph that gives a small description of the title. It will be useful to the user to get more information than the title. The character limit for the meta description is 155. Keep the description under the character limit and make sure you include the focus keyword at least once and try to include it in the beginning.
Chose a focus keyword – it is the keyword that you want your websites to rank for in the search engine and which terms you want to be found for. Your focus keyword can be a phrase. Choose your focus keyword, once you have entered your focus keyword, Yoast SEO will show how many time that focus keyword has been used in the post. This way you can make changes in the content to make it more SEO friendly.
You can read more about creating SEO friendly article in this article.
Speed and security for WordPress SEO
Speed and security of a website are very important aspects that get the users to stay on a website. Websites that take even an additional couple of seconds to load, will see a significant effect on their web traffic.
Security of a WordPress website is unavoidable. It takes some effort to earn the trust of the user on your website and a secure website will definitely earn a user’s trust. It is important to safeguard your website from any security breaches or spam attacks to protect the privacy and the data of your users. Luckily, there are a lot of plugins that can be used to safeguard your WordPress website.
If the security of your website is compromised and have been hacked, the SEO of your website will be affected. When Google finds a potentially malicious website or any irregularities in the website, They blacklist the website. When a website is blacklisted, it does not show up in any search results and they lose almost all of their organic traffic. So, it is important to keep your website safe and secure for good SEO.
Google ranks websites that load faster higher than those that take a while to load. The attention span and the patience of the internet user are not much. Websites with slow loading speed have a high bounce rate which means users leave their website early. Users won’t wait if the website takes longer to load even if it is a couple of seconds delay, and will not visit again.
Get a Theme Optimized for Speed
When you are getting a theme, make sure that you are getting a fast loading theme. When you are buying a premium theme, they usually advertise it on their website. But if you are getting a free theme make sure that you test it for speed before using it on your website. And I can not stress this enough, use a free theme only from the official WordPress directory.
Optimizing Images and Videos for SEO
Media files such as images and videos if not optimized properly can take up a lot of server space, bandwidth and affect the speed of your website significantly. So, it is very important that you optimize the images before you add them to your website.
Optimize the size of the image – you can a lot of free and premium plugins that will optimize the images that you upload to the WordPress media library. Or you can use other software to optimize the size of the image and then upload it to the media library.
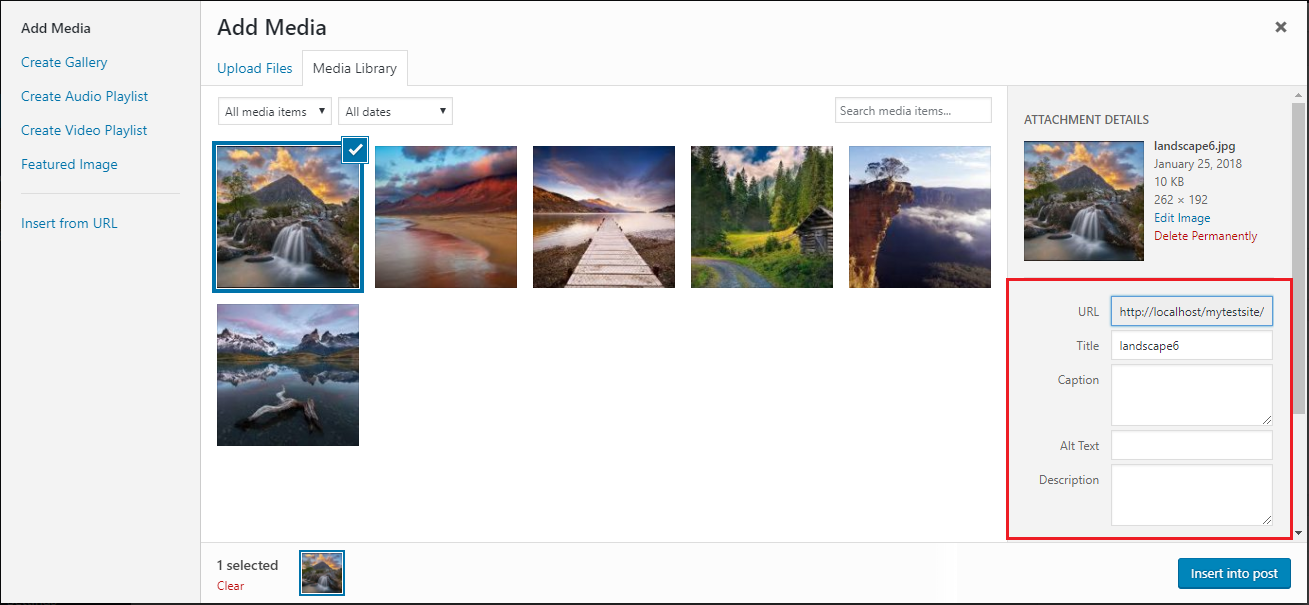
Optimize the image with descriptive names and alt tags – They also help the visually impaired users as their screen readers can read them the alt tags and title for them. You can add the title and the alt tag while inserting the image.
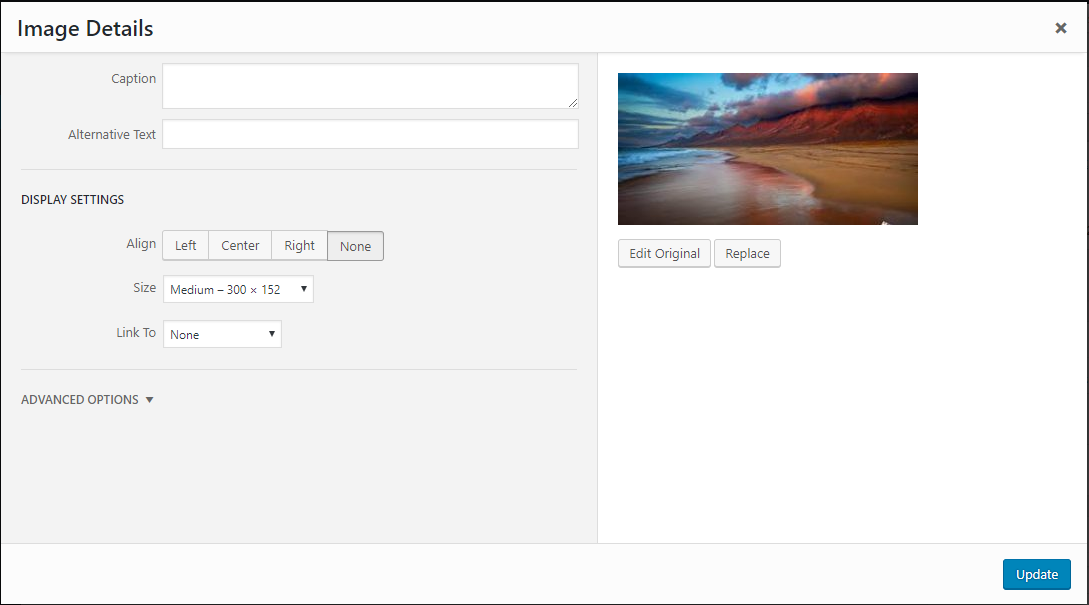
Another way to add title and alt tag is to click on the image after adding the image and then click on the pencil icon to add the title and the alt tag. don’t forget to update changes after that.
Give a meaningful name – it is always recommended to name the website that fully describes what the image is about.
Do not directly upload videos – Videos take up a lot of space and bandwidth and can make the websites slower. If you need to include video to your content, always include videos from popular video sharing sites like Youtube and Vimeo. WordPress loads the video automatically from these video sharing websites to your content and all you need to do is paste the URL of the video in a new line.
Wrapping Up
SEO for your website is a continuous process. After all, these steps for optimizing your website has been taken, you definitely will see a significant improvement in the organic traffic to your website. But always keep an eye on the traffic stats of your website. You will know where your site needs improvement because your site will always need improvement as Google keeps updating its algorithm to improve its search. You have to keep optimizing your website for best results. Refer to our guide to learn how to write SEO-friendly articles for your website.
