Table of Contents
Forms are an essential part of any WordPress website. WordPress offers very simple and plain registration and login forms. Many of you want to custom-build forms so that it aligns with your brand design and color. Some of you want to add more fields to the forms. Whatever your reasons, you need a plugin to create a custom form.
There are several free WordPress plugins available out there but those plugins generally offer limited features. You will need a dedicated plugin like ProfilePress or WPForms to create custom WordPress forms.
In this article, we will show you how to create custom registration and login forms for your WordPress website. We will show you how to add custom fields, make the new forms as default forms of your WordPress website, and create custom forms for checkout and my accounts pages.
Let’s get started.
How to Create Custom WordPress Forms
There are several plugins that’ll help you create a registration form for your WordPress website. But based on ease of use and functionalities, we have found ProfilePress to be the best form plugin out there.
ProfilePress offers beautiful pre-built forms which you can customize as per your needs using drag and drop features. That said, the plugin is much more than a form builder. Using ProfilePress you can create:
- Beautiful user profiles
- Searchable and filterable member directories
- Restrict access to posts, pages, and child pages
- Restrict access to categories, tags, custom post types, and taxonomies
On top of all this, you can expand the plugin’s functionality by using addons like Google reCAPTCHA, Polylang, two-factor authentication, etc. You can learn more about the plugin features on their features listing page.
ProfilePress is a premium plugin and to use it you will need to purchase a license that costs $79 annually for a single site. If you want to use it for more than one website, then subscribe to higher plans.
Let’s use the plugin to create custom WordPress forms.
Creating a Custom Registration
Install and activate ProfilePress on your WordPress website.
Step 1: To ensure that you can use custom fields on your form, you need to enable Custom Fields by going to ProfilePress > Addons > Custom Fields and toggle the button on.
Step 2: Now go to ProfilePress > Forms & Profiles > Add New > Registration.
Step 3: Next, you have the option to edit a pre-built template or create the form from scratch.
Building a form from the ground up requires knowledge of coding and many of you reading this article most likely don’t know how to code. In that case, choose the Drag & Drop Builder.
Step 4: On the next page, you will need to name the form and choose a template. Then you will proceed to design the form using the drag and drop builder.
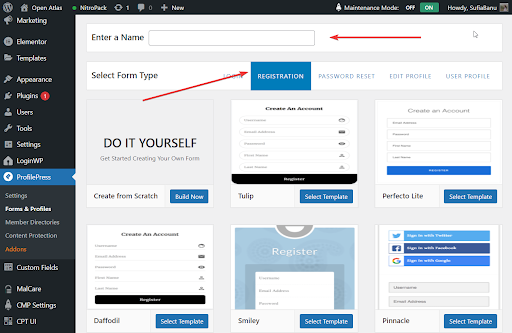
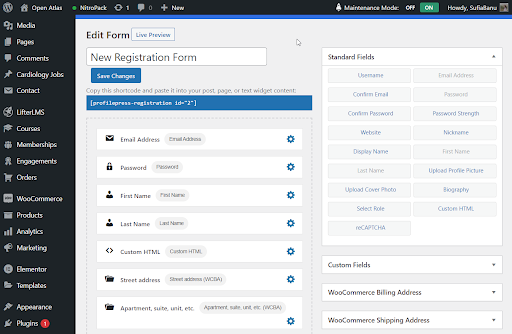
Step 5: Create the form by using the following custom fields:
- Username
- Email Address
- Confirm Email
- Password
- Confirm Password
- Password Strength
- Website
- Nickname
- Display Name
- First Name
- Last Name
- Upload Profile Picture
- Upload Cover Photo
- Biography
- Select Role
- Custom HTML
- reCAPTCHA
Step 6: Click on the Live Preview button to preview the form before saving the changes.
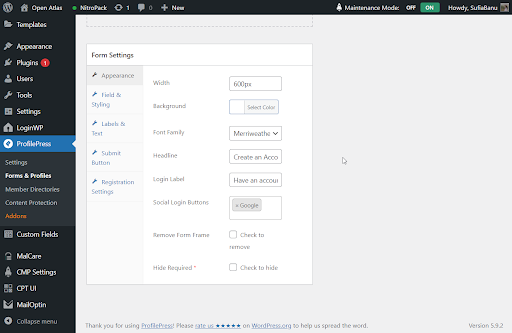
Step 7: Next, scroll down to the Form Settings. Here you can change the button labels, color, headline, and registration settings.
Step 8: When you are ready, hit the Save Changes button. That’s it. Your new registration form is now ready.
IMPORTANT: Want to add Google reCAPTCHA, social logins, or two-factor authentication to your form? The plugin allows you to extend and customize the functionality of your website. Learn more
Next, there are two things you need to do:
- You will need to publish the form on a new page or post
- Then make the new form your default WordPress registration form
We are covering both the tutorials in two different sections below. But first, let’s take a quick look at how to create a custom WordPress login form.
Creating a Custom Login Form
The steps you need to take are identical to that for the registration form except for two things:
Go to ProfilePress > Forms & Profiles > Add New > Drag & Drop Builder. And instead of choosing Registration, choose Login.

Then after you have named the form and chosen a template, you will notice that the custom fields are limited compared to the registration form. You don’t really need that many custom fields for a login form anyway.
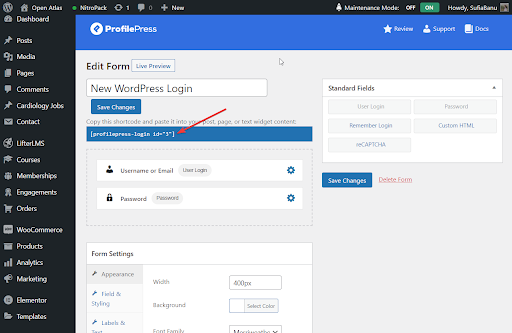
Here’s a list of the custom fields you can use on your login form:
- User login (Username or Email)
- Password
- Remember Login
- Custom HTML
- reCAPTCHA
Everything else is exactly the same as the registration form.
When your new login form is ready, proceed to the next section where you will learn how to publish the new forms (registration and login) and how to set them as default WordPress forms.
How to Publish the New Forms on Your Site
This is easy.
Go to ProfilePress > Forms & Profiles and select Login or Registration. On the right side of the forms, you should be able to see a shortcode. Copy the shortcode of the form you just created.
Next, create a new page by going to Pages > Add New and paste the shortcode. Name the page and hit Publish.
Your form is now live on your website.
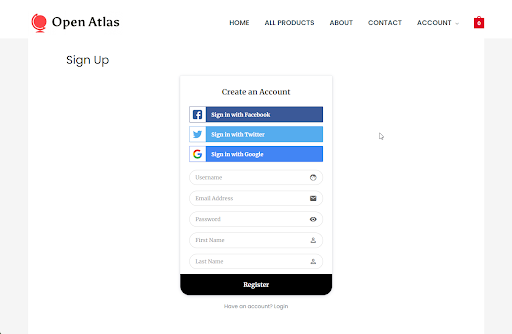
Here’s how the registration form looks on our demo site:
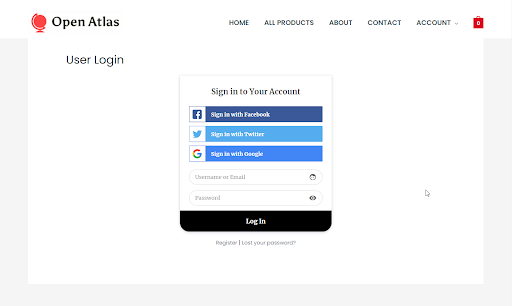
And here’s how the login form looks:
The next step is to make the new form your default login or registration form.
How to Set the New Forms as Your Default WordPress Form
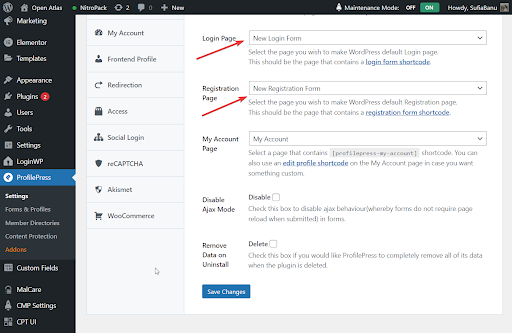
Go to ProfilePress > Settings > Global.
In the Login Page option, there is a drop-down menu. From the drop-down, select the new page where you have published the login form.
And in the Registration Page option, select the new page where you have published the registration form.
That’s it. Whenever someone tries to register or log into your site, they will encounter new forms.
How to Create Custom Forms for WooCommerce
Many of you reading this article are wondering if you can replace the forms of your WooCommerce website? Sure you can. Here’s how:
Activate and install ProfilePress on your WooCommerce website. Like we said earlier, in our personal experience ProfilePress is the best plugin you can use to create forms because it’s easy to use and offers a ton of functionalities.
Next, you need to enable WooCommerce integration by going to ProfilePress > Addon > WooCommerce and toggling the button on.

Creating a Custom Registration & Login Forms For WooCommerce
We have already covered the steps you need to take to create a Registration and Login form earlier in the article. You will need to follow the exact steps to build forms on your WooCommerce site.
When the forms are ready, publish them on two separate pages. We have also covered that in the “How to Publish the New Forms on Your Site” section.
We have also shown you how to set the new forms as the default registration and login form on your website. You will need to follow the same steps on your WooCommerce site.
Adding Custom Fields to WooCommerce Checkout Forms
There are two types of checkout forms: registration and login. In this section, you will learn how to create custom checkout registration or login forms.
Custom Checkout Login Form
Want to replace your default checkout login form with a custom checkout login form?
Let’s first, create a custom checkout login form. We have already shown you how to do that in a previous section. Please follow the steps in the “Creating a Custom Login Form” section.
Done? Now, go to ProfilePress > Settings > General > WooCommerce.
You should see an option called Checkout Login Form. It comes with a dropdown menu. Select the new form from the dropdown menu and save your setting.
Your customers should be able to use the new form to log in during checkout.
Checkout Registration Form
As for the registration form, ProfilePress allows you to add custom fields to the WooCommerce checkout registration form. You don’t need to create a registration form from scratch. Your website will use your default registration form as the checkout registration form but you can add custom fields to the form.
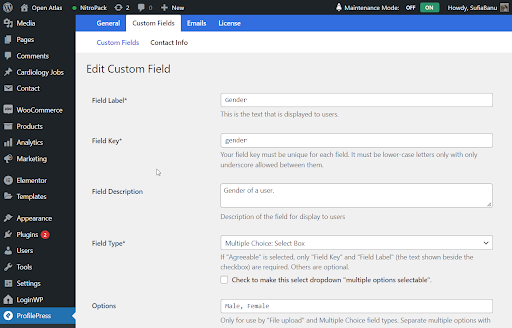
To add custom fields to your checkout registration form you need to first create the custom fields.
Go to WooCommerce > Settings > Accounts & Privacy and enable the option “Allow customers to create an account during checkout.”

Then go to ProfilePress > Settings > Custom Fields > Add New. On the next page, enter the label, key, description, and field type. Save your setting.
When you are done creating all the custom fields, add them to the checkout registration form.
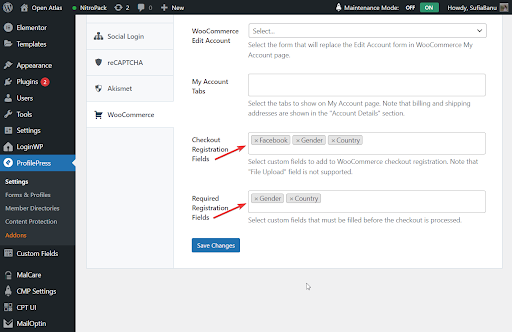
Go to ProfilePress > Settings > General > WooCommerce > Checkout Registration Fields and the fields you just created should appear as a dropdown. Select them.
In the next section (i.e. Required Registration Fields), you can insert the custom fields that you want to make mandatory.
Custom My Account Registration & Login Forms
With ProfilePress you have the option to set a custom registration and login form. You will first need to create the forms on your WordPress website. Simply follow the steps we have covered in the “How to Create Custom WordPress Forms.”
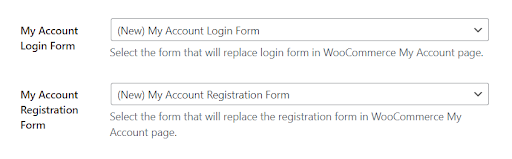
Then go to ProfilePress > Settings > General > WooCommerce > My Account Login Form and select the new login form you just created.
Then go to My Account Registration Form and select the new registration form you just created.
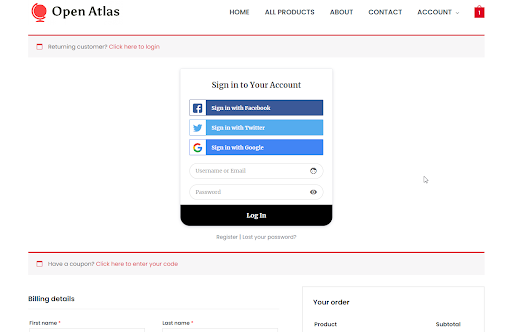
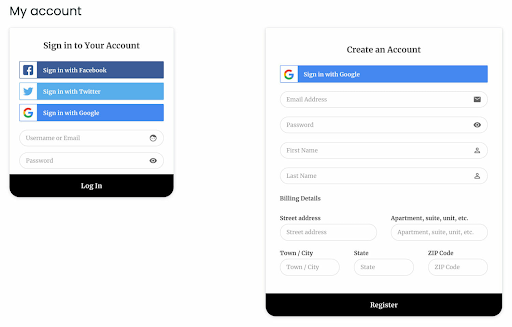
Below is a preview of how it might look on the WooCommerce My Account page.
That’s it, folks. With that, we have come to the end of this tutorial.
Final Thoughts
Creating a custom WordPress registration and the login form is a great idea. You can add custom fields, collect more users’ data and design the form in a way that looks suitable for your brand.
While there are many plugins out there that’ll help you create forms on your WordPress website, we found ProfilePress to be the best user registration and login form plugin. It’s very easy to use and it integrates with WooCommerce stores.
We also recommend you to read our article on How to customize and secure WordPress Login Page.
